200TDI Engine Conversion
200TDi Engine Conversion? Well, that's been the plan for about the last 3 years now. I decided that an engine upgrade would be a good idea and started to ask questions and read a lot of forums on what would be the best engine to change too. 3 years ago, I decided that a 200TDi would be the way to go after listening to a lot of other folk that had gone the same route. I'm getting fed up with the lack of "Pull" when the caravan is on tow. Also getting fed up with having to change down a gear at the breeze of the sight of a hill. With the caravan on, this really could become a joke with gear changing and I sometimes finished up in 2nd gear and a queue building up behind me.
So?, to go with the turbo or not? Most will tell you, "Why Bother" not fitting it, as without it, you don't get the full potential from the engine. Some have fitted the 200TDi without the turbo and are very happy with it, but they don't tow a caravan around most weekends. So, the way to go for me is fit the turbo and make full use of the hard work going into changing an engine. Lots of controversy over whether to fit the intercooler also. And, the oil cooler? Some have left this out of the equation also. But, for me, it's all going in. If you're going to do a job, do it right and go with all the expertise and experience of those that know and those that have done the conversion.
-------------------------------------------------------------
18th May 2016
Well watch this space. This weekend could be the weekend to swop the engines over. I have the brother-in-law coming to to stay for a few days, so I may just rope in some help from him?
-----------------------------------------------------------
31st May 2016
Engine is out and the gearbox is in bits. I need to swap the bellhousings over. I have a newly rebuilt six pot gearbox and I need to fit a four pot bellhousing to it. When I took the bellhousing off the four pot one, the bearings all fell apart. I've been using this gearbox for about 5 years and while it's been a good easy gear change box, the reverse has always been atrocious. It always sounded like it was grinding and that the gears were not meshing correctly. Well the noise was actually coming from the roller bearings. They had fell apart and were grinding away their housing. Anyhow, today is the day I have a look and see if I can swap parts over to make a good usable gearbox.
---------------------------------------------------------------
4th June 2016
I've spent the afternoon/evening out in the garage and got some more done to the 200TDI.
Also, a couple of days ago, I had a look and took the bellhousing off the Six Pot Gearbox. I went slow and steady and had full concentration on what I was doing. It came apart with no drama and it certainly looked a lot better than the Four Pot one.
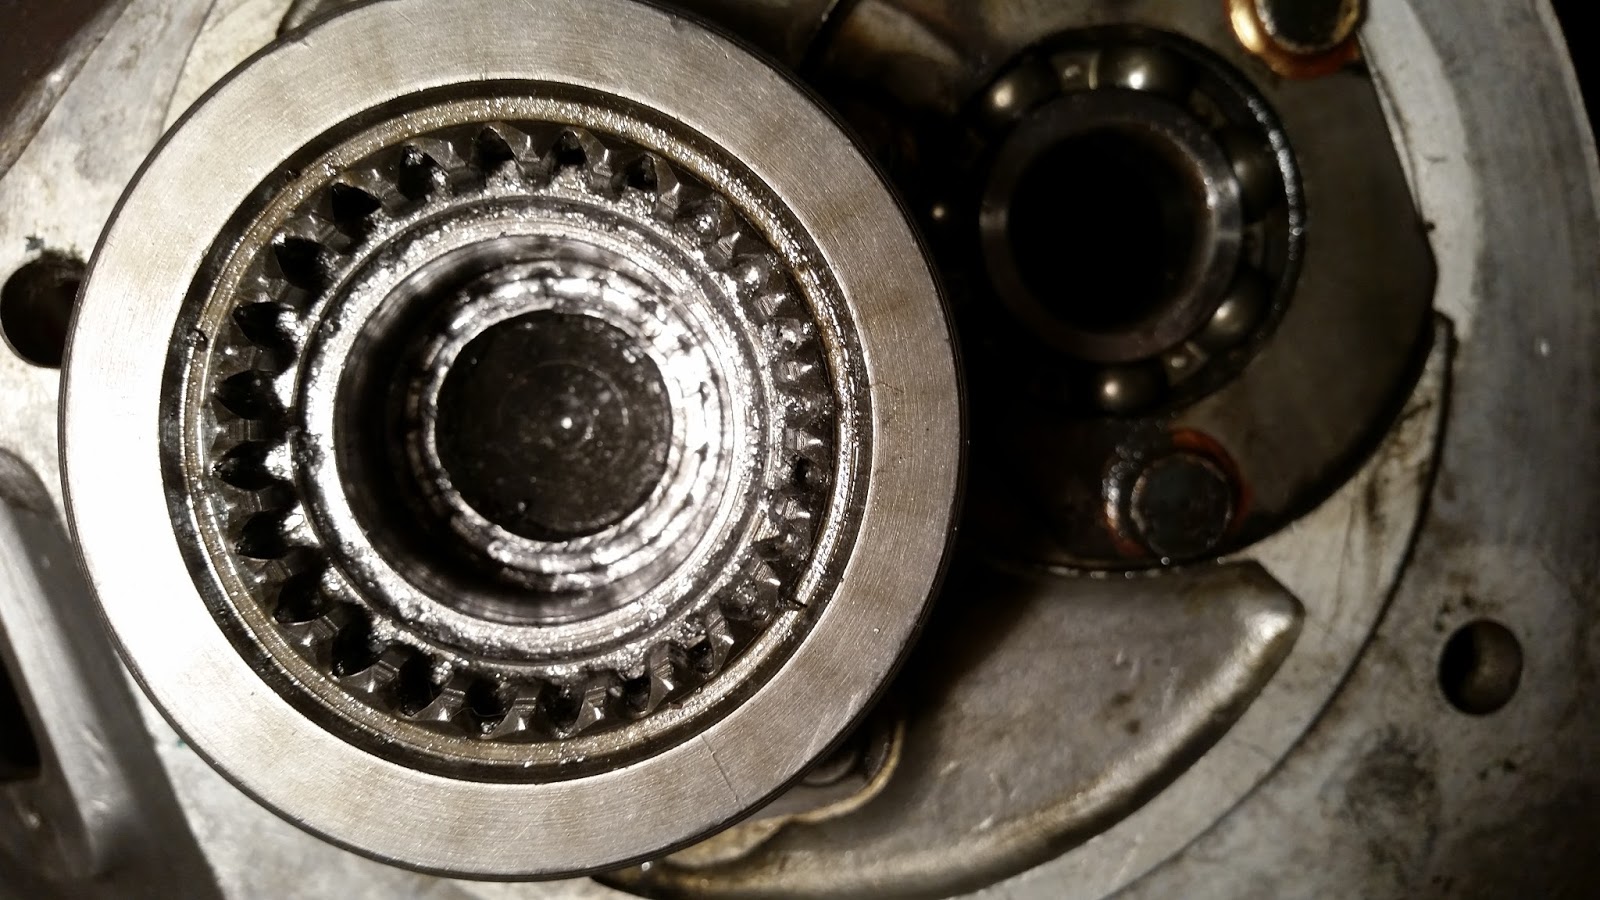
Here's the Four Pot roller bearings.
So most of it fell on the floor. The roller bearings casing had actually disappeared. The bolt that holds the gear onto the layshaft had come undone and if you look closely, you'll see that the threads have worn away with where it had been just resting in the hole. I'm thinking that there wasn't any Thread Lock on this bolt when it was put together?
The Six Pot was looking a lot better.
It was all intact with the bearings looking like new.
So now I set too and took the drive shafts and bearings out of each Bellhousing. The four pot bearings felt okay, except for the roller bearing which were all still over the floor. The drive shaft from the Four Pot is now going to be a "Clutch Alignment Tool" because the insides are looking shot.
Take a closer look. Click on the photo.
The roller bearings have had a good time in there.
So, the plan is to clean up the Four Pot Bell Housing and fit the newer bearings and drive shaft from the Six Pot. Both are stripped out, but not put back together yet.
The Four Pot Bits.
A broken retaining stud.
The Six Pot Bits.
While the bellhousing was off and had no bits fitted, it was light enough to move around and trial fit to the engine. One stud needed moving and three holes needed drilling out and retapping.
The stud first.
Then the three holes at the bottom of the bellhousing.
These were drilled out, re-tapped and M12 bolts fitted.
Once I sorted the three holes out, I fitted a NOS Clutch and Pressure Plate for a Series III.
Using my new "Alignment Tool".
Hopefully, when I go to mate the gearbox with the engine, both should just line up and slip together?
We'll see......
Next I fitted a brand new Starter Motor.
Also fitted the Inlet Manifold and Exhaust/Turbo.
This is a 300TDI Turbo which I have cleaned up and painted.
There's barely any movement in the vane shaft and it was bought from a friend that had stripped a 300TDI down and assured me that it was a "Good'un".
----------------------------------------------------------------
5th June 2016
Today, I fitted a NOS 70 amp Alternator. I've had it sat in its box on a shelf in my garage since 2003. I'm not a 100% happy with the set up, but it is solid enough. I may at a later date change the adjuster bar with a longer one and fit a longer belt. At the moment, I'm using the standard Discovery belt. It all fits in "Snug", but I think I would prefer a longer belt and a longer adjuster bar?
-------------------------------------------------------------
8th June 2016
Today I put the bellhousing on the gearbox. First had to fit the bearings and I used the new bearings from the Six Pot. Infact, I used everything from the Six Pot in fitting the Four Pot Bellhousing. I had to improvise in doing up the bolt on the Layshaft. This has to be smeared in a little "Loctite" and then fit it. The trouble you have is doing it up tight. So I left a socket and ratchet on the bolt and put an old clutch plate on the drive shaft and turned the plate round as tight as I could using the internal gears to turn the shafts, thus tightening the bolt. As an after thought, I could have used a Monkey Wrench and locked the drive shaft and then did the bolt up, but I had not thought about this at the time. I'm sure the bolt is as tight as it needs to be? I hope so....
-------------------------------------------------------------
17th June 2016
Nothing has been done for a few days. But today, I have managed to get the gearbox back in. I have also connected the speedo cable and handbrake linkage. The clutch slave cylinder is also fitted, as is the clutch release fork and a new release bearing. At the moment, I'm half way through fitting the overdrive. I just have the linkage to fit and the top covers, once I have filled the transfer box and and overdrive with oil. EP90.
This is my drive shaft locking tool.
Monkey Wrench does the job just perfectly.
I needed to do this nut up to 100 foot lbs.
I bought a special tool for this castellated nut.
You can't do the job properly without it.
So, today was a productive day, Hip Hip, Hooray.
I got something done at last.
-------------------------------------------------------------
18th June 2016
Modified and fitted the dipstick and remade a retaining bracket to stop it waving around. After fitting the 300 turbo, you find it gets in the way of the dipstick. So with a little bending you can re route it, but then the little bracket doesn't fit. So, I cut it off and welded the two bits together and wrapped it around the dipstick.
It now fits tidy and doesn't flap around and also, the dipstick pulls out and goes back in easily.
Also cleaned up and fitted the oil feed and drain pipe to the turbo.
You need the 300 pipes when fitting a 300 turbo to the 200tdi.
Next is to get a downpipe made up for the exhaust.
Note, in the photo below, how close the exhaust and engine bracket is.
This mod is (I think) the biggest bugbear in the whole conversion. I can just fork out lots of £££'s and buy a Steve Parker Exhaust, but it's the cost that is putting me off.
---------------------------------------------------------------
19th June 2016
Sourced a 300tdi Defender down pipe from a great and very helpful bloke we call Scott-e-Dog on Northants 4x4.. Scott does a lot to help others in the 4x4 world. He has his own workshop and works all hours to help get other back on the road. Sent him a text and picked up the pipe an hour later. It's a scrapper pipe as the flexi section is holed, but I don't need this bit. Just the down section with the bend is the bit I need.
Sits very close to the engine mount.
Used Defender engine mounts.
These are bigger than the standard Series Petrol Mounts.
A section has to be ground away for them to sit right.
See here.
It is only the one mount that needs a grinding.
Connected the handbrake back up and fitted the Speedo Cable.
Connected the overdrive linkage and lever.
I also filled the gearbox, Transfer Box and Overdrive with EP90.
I use this filling pump bottle to get the oil in the right holes.
Also, While I was at it and had easier access, I topped up the oil in the Steering box.
-----------------------------------------------------------
20th June 2016
Ground off the sticky out threaded bit that the Viscous Fan mounts up too.
I didn't really have to do this, but it just looks better not sticking out.
Removed all the old throttle linkage including the pedal.
This won't be needed, as I'll be fitting an early 90/110 throttle pedal and cable.
This makes for a better progressive throttle movement.
I also removed the choke cable, as this won't be needed.
Linkage removal.
90/110 cable.
90/110 throttle pedal cleaned up ready for fitment..
Thought to myself, while I could get at it, to drain and refill the steering relay. A lot of black oil ran out of it. I squirted Plusgas in the top end and moved the steering to and throw to release any old black oil residue. I've now left this overnight to drain and dry out proper before I refill it.
I removed two bolts from the top of the relay and two opposing bolts from the bottom.
------------------------------------------------------------
21st June 2016
Had a severe bout of "Can't be Arsed'ness" this evening.
I did go to work, but left earlier than planned.
Got a snotty nose, headache and toothache.
Been to the dentist and got penicillin for an abscess under my tooth.
Got to have a tooth out on the 1st July.
Off to bed now feeling ill.
--------------------------------------------------------------
22nd June 2016
Filled the Steering Relay with oil, after it had been left open to drain for a couple of days. Did this very slowly. You have to wait for all the air bubbles to rise. So both bolts were put back in the bottom end and the two at the top were left out. The idea is to pour in the oil bit by bit and soon you'll see little bubbles popping out the bolt holes. Keep at it till the bubbles stop and oil is at the top of the holes.
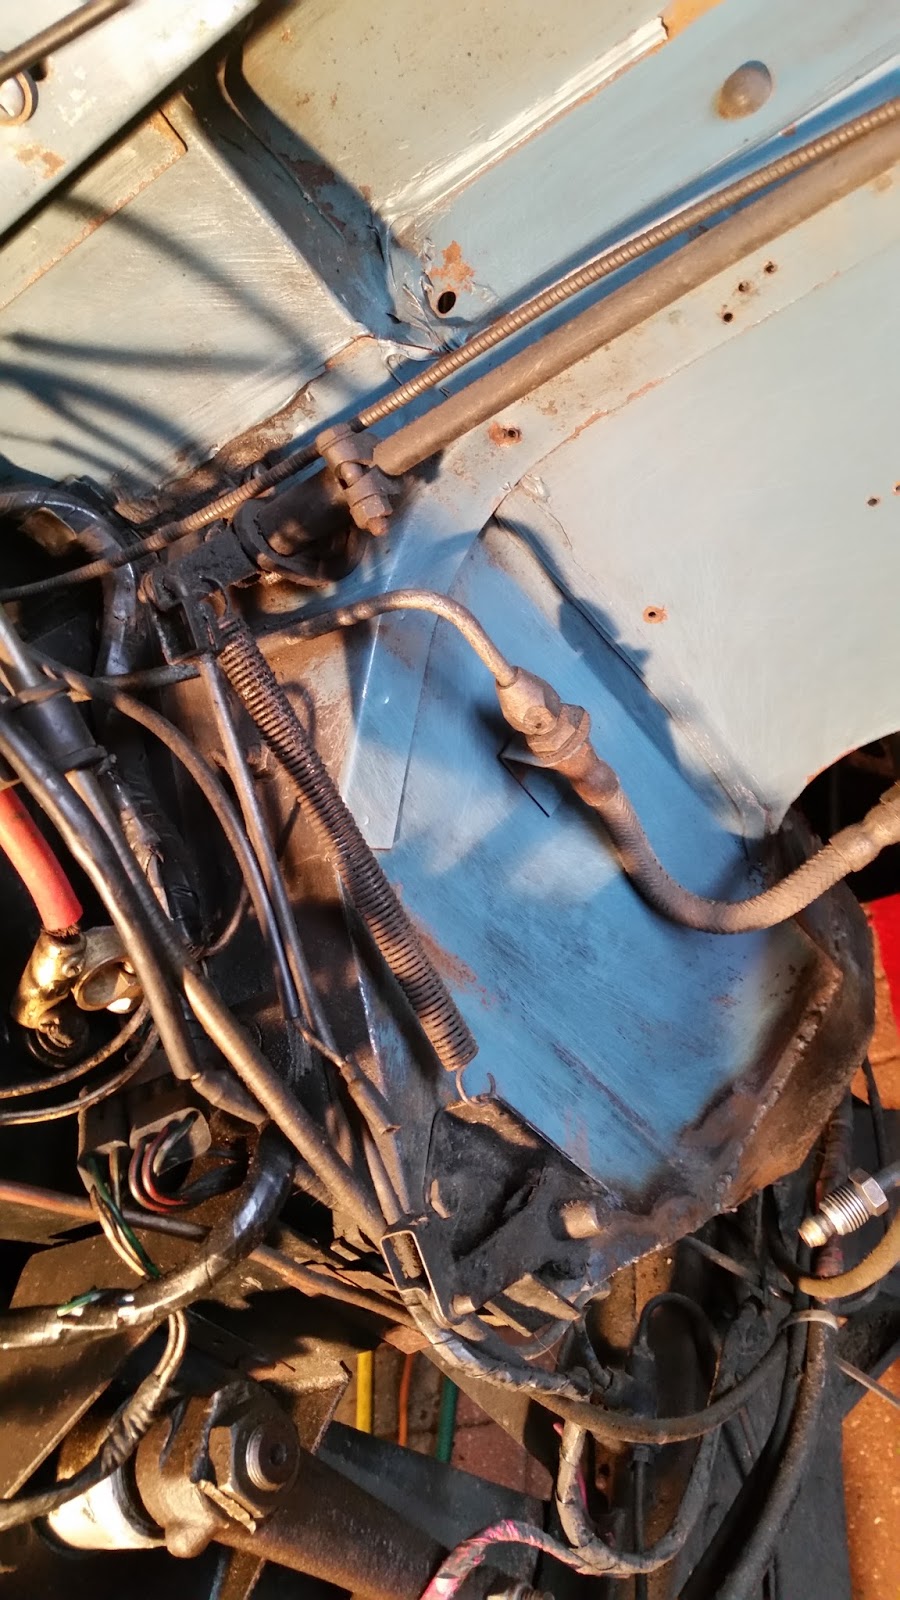
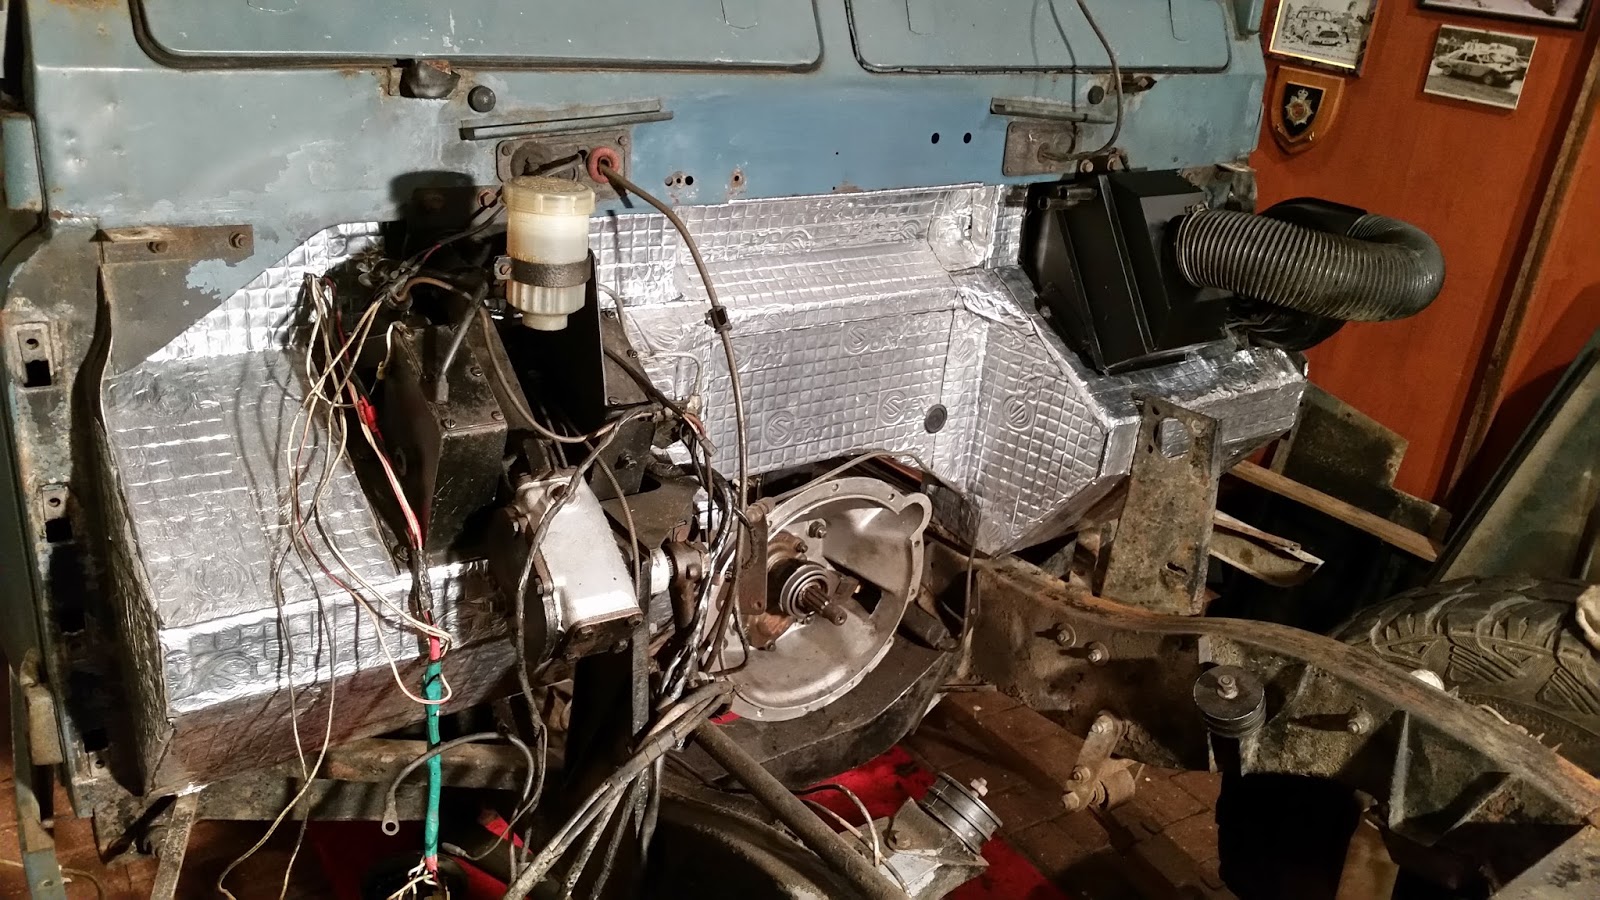
So while I was waiting for bubbles to rise, I got on with cleaning the bulkhead with some hot soapy water and degreaser. Once cleaned, I applied some Sound Deadening Mats. These are stick-on and they really do stick to everything they touch. These will/should reduce some of the noise the engine will make. I'll be applying these mats to the inside of the doors and various other places. I already have the Wright Off-Road Acoustic Mat System ... Expensive, but good hard wearing and washable stuff it is.
-------------------------------------------------------
25th June 2016
Back on it today.
Took the Heater Matrix and Blower off to put some Sound Deadening Mat underneath. Also covered the bulkhead footwells in the Mat.

So while the heater was off, I gave it a bit of refurbishment. I ran water through it and gave it a good shake till water ran out clear. Because of the angle the matrix sits, it gets to hoard all the crap that gets pumped around the engine coolant. So every now and then, it needs a flushing out. I also blocked off the rusty holes with Duct Tape. I did this about 5 years ago and it had still held till today. It had gone a bit brittle, but still stuck to the sides.
-------------------------------------------------------
26th June 2016
Did the same with the blower and gave it a coat of paint.
Then put them both back on, once I had laid some more Matting.
This heater has always work well and with the doors closed and the heater on full blow, it get very hot in the Truck Cab. So hot, that you need to open a window. I generally opened the rear window, rather than the side windows on a freezing cold day.
------------------------------------------------------
29th June
So today I thought I'd put the prop shafts back on. Put the rear one first and while I'm crawling around under the Landy I spotted an oily mess at the back of the offside rear brake backplate. Bugger, I'm going to have to investigate, as I have an MOT coming up and having an oily mess is not a good thing anyway.
So more on that in a bit.
After fitting the rear prop and giving the slider and UJ's a greasing I moved onto the front prop. I soon found that the slider wouldn't slide at all. Popped it in the vice and moved the rubber gaiter out of the way and found it to be quite rusty.
Left it for a while with Plus Gas soaking in.
Had a cuppa tea while I waited.
This was a new prop last year and it was obviously not greased on the slider. The UJ's, as I remember, were greased, as I remember seeing grease spilling out of them. I assumed that the slider was greased, but with a rubber gaitor covering the evidence, I missed it. Anyhow, it moves nicely now after pulling it apart and cleaning up the slider and putting it back together with plenty of grease. UJ's were regreased also.
So once the prop was fitted I got on with stripping the Hub down. The rear hub seal is worn out and leaked grease all over the back plate. I'm lucky to have caught it before it made it's way to the brake shoes.
Still plenty of life left in the shoes.
Cleaned up the back plate after taken the hub off and the bearings.
I just happened to have stashed away in a box on a shelf in the garage, spare gaskets, locking washer and a seal. I can't for the life of me remember where I got them. Most likely from a Landy spares day somewhere? Could have been a Steam Rally, as sometimes you find the odd Landy spare part for sale cheap enough.
I need to clean up and inspect the bearings. Probably on Friday as I have a long driving day tomorrow. If all is good, it'll go back together on Friday as well.
------------------------------------------------------
1st July 2016
Well this evening I cleaned up the taper bearing and it subsequently fell apart.
So a new bearing is needed.
After cleaning the Drive Flange, I found the splines to be very worn.
So a new Flange is needed.
I'm thinking that I should look at the near side and check it out.
If the off side is worn, then the near side could be worn also.
------------------------------------------------------
2nd July 2016
Russ Beck came to my rescue today. He came over to mine baring gifts in the way of two used, but in good condition, Drive Flanges and bearings. More on fitting these later.
Russ also came over to help with fitting the engine up to the gearbox. Two pairs of hands is better than one when it comes to fitting engines. He was very helpful and more knowledgeable with the 200TDI than I. I'm still learning with a diesel engine, full stop, let alone with a 200TDI. I'm learning as I go along.
So on to the engine. We got it hanging on the hoist so it was just about as level as we could get it. Then lifted it and dropped it slowly downwards into the engine bay. We had removed the engine mounts to give us more room to jiggle the engine onto the gearbox. Once the drive shaft was inside the pressure plate, we set about getting the gearbox and engine level with each other using a jack and big bits of timber to lift and steady the gearbox from underneath. Then we got the engine sort of parallel with the gearbox and with a little bit of shoving and jiggling it slipped straight on. Really only took about 10 minutes of fiddling and on it went. A couple of nuts were put on the bellhousing to stop everything dropping out again. The bolts that were tapped out at the bottom of the engine/bellhousing were put in and then the rest of the nuts around the bellhousing. Once we were satisfied that the two items were together proper, we then fiddled with the engine mounts. The near side wasn't difficult to fit but the offside proved a little more fiddly. Eventually the engine was sitting on it's own mounts the hoist could be pulled out of the way.
Here is Russ sorting the engine mount.
Next thing was the exhaust down pipe. We needed to put it in position and mark it where it touched the engine mount. Took it off and heated it to red hot and gave where it touched a clout with a copper hammer. Just a slight impression was needed to clear the engine mount.
It now fits with a the tiniest of a gap to the engine mount.
Probably a fag paper will slide down between, but nothing else.
Also, the Turbo sits quite close the upright bulkhead support bracket.
Depending on what hose I fit, I may cut a piece off the bracket.
I'll be getting back to the engine later. So Russ went home for food and relaxation and I went in for food and the washing up. It was gone six in the evening and Paula (my wife) was home cooking dinner. While dinner was on the go I did a bit of tidying up in the garage and got the hub and bearings ready for assembly.
Put the bigger bearing of the two in with it well greased and fitted the new seal.
Then flipped the hub over and greased the insides well.
Can you tell which is the good and which isn't?
The fitted the good bearing.
The grease should hold it in, but watch it doesn't drop out when offering it up to the Shaft.
Here you can see the splines are in a better state than the old one.
Hub and bearings back on the shaft.
Fit the spacer washer first.
 Then screw on one of the locking nuts.
I use the hub nut socket and keep tightening it till it feels a bit stiff to turn the hub. Back off the nut a bit till it's loose, then turn the nut finger tight only and feel for play/rocking within the bearing and hub. It needs to rock just a tiny bit.
Then fit the locking tab washer and the second nut.
Now it tighten this nut right up with the big hub nut socket and feel for play/rocking in the hub. If it's right, you shouldn't feel any rocking in the hub.
Then screw on one of the locking nuts.
I use the hub nut socket and keep tightening it till it feels a bit stiff to turn the hub. Back off the nut a bit till it's loose, then turn the nut finger tight only and feel for play/rocking within the bearing and hub. It needs to rock just a tiny bit.
Then fit the locking tab washer and the second nut.
Now it tighten this nut right up with the big hub nut socket and feel for play/rocking in the hub. If it's right, you shouldn't feel any rocking in the hub.
Once happy with the play/rocking, knock the tab washer on one side over the inner nut and prise it out over the outer nut.
New gasket on.
Slide the half shaft in the hole with the flange fitted and secured with the Circlip.
Push and turn slightly till the splines in the diff meet with the splines on the shaft.
Turn the hub till the bolts holes line up and then bolt it all up together.
Fit the drum back on having already turned the snail cam adjusters to the loose undone position. Then fit the wheel back on. Adjust the snail cams till the shoes meet with the drum then back it off one click.
-----------------------------------------------------
6th July 2016
Had a look at the drive flange on the near side rear. Slight play was found, but nothing serious. However, I fitted the newer flange I got off Russ as this was a far better tighter fit. I'll keep the one I took off. I'll be okay as a spare.
There was no play in the bearings and no strange noises when spun, so I left them be. I didn't want to fix something that ain't broke.
----------------------------------------------------
10th July 2016
I found that the clutch pipe steady bracket that was just hanging in there actually lined up perfect with two holes on the side of the block. Brilliant, so I bolted it up.
11th July 2016
Made a simple bracket for the diesel filter.
First I roughly measured and cut a length of 1" box section and then got the flap disc on it to clean it up.
Then drilled a couple of 12mm holes in it.
Bolted up the filter housing and then welded the nuts to the inside of the box section.
Then lined it up where I wanted to mount it and cleaned up the area on the bulkhead to be welded. I weld each end and then ran a weld in the middle. It's now solid to the bulkhead.
Cleaned it up and stuck some sound deadening mat over the weld and bracket. Also, where the fuel pipe touched on the engine, I cut a piece of nylon pipe to length and then cut down one side through its length from end to end. I could then open it up and place it around the fuel pipe so the pipe is protected from rubbing anywhere.
I'm happy with how this all fitted.
Must find some paint for this.
-----------------------------------------------------------
14th July 2016
Russ had pointed out to me about how close the propshaft is to the oil return pipe on the sump. I shall be taking a grinder to the bracket on the sump and moving the jubilee clips. Also, I've been told that lifting/raising the engine on the mounts with spacers helps give more clearance, So, I need to make some spacers or find some big thick washers.
So on to the throttle pedal.
As I said earlier, I have removed all the old rod linkage as I need to fit the pedal and cable from a 90/110. This gives a smoother movement on the throttle.
This hole is where the rod pedal stop was.
I used this as a guide to how far across the pedal needed to go to.
The engine end of the cable.
After offering up the pedal, I found you need to cut off the lower part of the mounting bracket up to the first bolt holes. You'll not need the bolt holes. The bracket will now fit flush to the bulkhead bodywork. However, once drilled and bolted up, you don't get enough pedal movement to get full throttle. So rather than cutting a hole in the floor, I ground a section off the bottom of the pedal arm and also cut the pedal bolt stop bracket. I left the return spring in place so I could see how much I had ground away.
I then lifted the spring off and ground more off where the spring sits.
Then I welded the bolt stop bracket back on.
And then ground of any access weld and tidied up the pedal.
I now get full movement to get full throttle.
The one cable popping out of the bulkhead is a lot better than lots of rod linkage everywhere.
Pedal fitted.
Drained the tank in readiness of sorting the fuel system.
Took the sender out and removed the filler pipe.
Left the drain plug off and left it to vent for a day or two.
The petrol went into a can I use for my lawn mower and petrol garden machinery.
-----------------------------------------------------
16th July 2016
The fuel pump inlet pipe was easy.
I just took the discovery one off and fitted the the series one.
Same fitting and same thread and just enough pipe to reach.
The outlet return pipe from the injector pump was different. This one had an olive and screw fit union and I didn't have the other end to fit this. So, after some rummaging I found a pipe from a stripped discovery with a push fit rubber hose. I checked another engine that I have and found that this needed the push fit hose that I'm holding.
So I swapped the outlet pipes over and fitted the push fit rubber hose one.
To make up a fuel return pipe, I needed to join the plastic pipe from the tank and the plastic pipe from the injector pump. As this pipe is a shrink fit I needed something small enough to fit the pipe. I found two airline connectors and an adapter fitting. The adapter fitting needed to be threaded right through, so I tapped it out and fitted a connector to either end. I then put the plastic pipe in the vice and heated very gently, the end of the pipe while I held the connector in the heat at the same time. I then pushed the two ends together and once cold, there was a nice tight fit.
The rubber hose end to go on the outlet pipe from the injector pump.
So on to the fuel tank.
I was just going to drill a couple of holes and fit the extra return/pickup pipe into the top of the petrol tank. But, I had a NOS diesel tank sat up in the big shed with the correct holes already drilled. I decided to fit the new tank, thinking that this would be better and it would give self satisfaction knowing the tank was a good one.. As it turned out, the petrol tank was fine and will clean up nice, ready to be fitted to another project at sometime in the future.
I removed the sender and pickup pipe from the petrol tank and fitted this to the diesel tank, but not before preparing the tank for fitment. I gave the bits that tend to get rusty a good brush on coat of zinc primer.
Then a coat of Toolbox Red.
Then fitted the sender and then fitted the tank in position on the chassis.
Note to self.
Always trial fit something before you decide to paint it.
-------------------------
Next was all the piping.
This filler pipe is the old one that was fitted to the petrol tank. It's still good with no signs of splitting or cracking. I have a new pipe, but I couldn't get it to fit.
See the difference in size of the old and new filler pipe.
All pipes and fittings fitted and ready for filling up with diesel.
Remember I said, I needed to find some paint for this?
I think it looks great in Toolbox Red.
------------------------------------------------------
23rd July 2016
Not done anything to the Landy for a week. Working for a living gets in the way, but it's got to be done to pay for fun.
So today I sorted the heater hose's and sort of trial fitted an air intake pipe and filter. Sort of happy with the heater pipes, but I have ordered a new hose, so both look the same and travel the same route. The one you see joined will run behind the Turbo Air Induction hose alongside the other heater hose.
Fitted an earth lead from the engine/starter to the chassis.
This was fitted to the old petrol engine and was in good nick, so I cleaned up the mounting areas and bolted it in with plenty of copper ease in there too.
------------------------------------------------------
24th July 2016
As I don't have a Brake Servo, I don't need a vacuum pump. I'm wondering if it can be removed altogether and blanked off with a plate of some sort? However, for now, I have been told just to plug the hole. So trying to source something the right size to stick in the rubber hose that was on the short pipe, I found an Air Bed Bung. This fitted very tightly in the pipe. So I removed the hose and hammered in the bung, then cut off and filed over the end so it was flush.
The Air Bed Bung.
I'm hoping it's not going to melt?
-----------------------------------------------------
30th July 2016
So in the week, I cut a hole in the base section under the passenger side of the seatbox. After a bit of searching, I found that I could buy a seat box repair/replace section with a well for twin batteries and pop rivet it in. However, I didn't need a full section for £77.00 and I decided to make my own twin battery well. At a lot less cost and to the satisfaction that I made it myself.
Found some sheet metal and set too with a Welder, Guillotine and Folder.
After a bit of cutting, folding and welding, I made this box.
Inside the box is a frame that I aquired a while ago. It's been made to carry and clamp down two batteries. It was a bit rusty, so I cleaned it up and used it as a template for the size of the box and some measuring gave me the depth I needed.
I welded the frame to the inside of the box.
I then also gave the box a good coating of Zinc Primer.
Also today, the postman came and delivered the other hose I was after.
The heater hoses now look like this.
They look much tidier than the other joined hose.
Took a look at the water temperature sender.
The one on the left is the discovery one.
This one is no good for the Series 3 Gauge.
The one on the right is the Series 3 one and works with the gauge.
So I need to get an adapter to fit the series one to the 200TDi engine.
------------------------------------------------------
31st July 2016
First thing this morning, I was out in the garage in my undies giving the battery well a Coat of Toolbox Red.
I left the inside in Zinc Primer, as I'm going to cover it in Silent Coat Matting.
Lined it up for welding in.
Ground off the cacky welds and then gave it a coat of Zinc Primer over the welded bits.
I've had two of these batteries just sitting on the floor of the garage for about 3 years with the intention of fitting them under the passenger seat. They are still holding a charge, albeit at 12.7 volts. One is on an overnight charge to see if it will come up over 13 volts.
Coated the inside with Silent Coat and placed the batteries in.
I still need to drill a couple of holes somewhere for the cables to go through and fit a "Split Charge Device".
-----------------------------------------------
6th August 2016
Through the week, I've been looking at and sorting some wiring. Found the wire for the Oil Pressure Switch, Starter Solenoid and the Water Temperature Sender. I brought an Adapter for the Temp Sender from https://www.steveparkers.com/ ... Fitted fine with no worries.
Wired up the Split Charge unit.
Drilled a couple of holes in the bottom of the Battery Box for the battery to Starter wire and an earth wire to the chassis. I welded a piece of pre-drilled angle to the chassis for a good earth.
Fitted an Air Intake Pipe and a Cone Filter. I'm not sure yet as to where the filter will sit or whether to shorten the pipe. I'll look into this when the bonnet and other bits are fitted.
Also wired up the fuel solenoid on the Injector Pump.
Got the Alternator wired up as well.
That's pretty much all the electrics for now.
Still got to wire up the lights when the wings go back on.
Also today, I got the seat box partly bolted in.
-------------------------------------------------------
7th August 2016
Put a few more bolts in the Seatbox. Still not got them all in yet.
I have mainly been cleaning up the underside of the tunnel and floor sections, so that I could stick some Silent Coat on them. After a good while with wire brushing and DA Sanding, I sprayed a light coat of primer on them.
Then covered them in Silent Coat.
I'm hoping to tone down the noise from the engine and gearbox.
One thing I'm a bit gutted with, is that I had a friend round to help me lift the seat box in, but I hadn't covered the underside of the seat box. I have covered the battery box internally and the tool tray externally that sits in the middle of the seat box. I can do the covering from underneath, but I'm not going to get above the fuel tank without taking the seat box out again.
Hey-Ho, that's life.
Gear Stick went back on today.
-------------------------------------------------
9th August 2016
Got the Seat Box, Floor and Gearbox Tunnel all bolted in and fitted the Wright Off-Road Acoustic Matting.
Around the Overdrive lever is a bit of a gap. It proved a bit of a job to get the hole just right when I cut it out years ago when fitting the Overdrive. So I covered the hole with Silent Coat.
Acoustic Matting went in and all the knobs went back on their respective sticks. Here you can see my Gallstone in the Gear Stick Knob. I turned out a lump of Aluminium placed the Gallstone in and filled it with Resin.
-------------------------------------------------------------
10th August 2016
This evening, I only had an hour or so, so I spent the time putting the Seats and Morris Minor Steering Wheel back in.
--------------------------------------------------------
13th August 2016
Seatbelts went in today.
--------------------------------------------------------
14th August 2016
Tried to fit the oil hoses to the Oil Cooler. They didn't fit. I have the later hoses and an earlier adapters in the Radiator. I've put the feelers out for some later adapters. Hopefully someone in the club will have some, otherwise, I'll buy new.
Here you can see the 'later' on the left and 'earlier' on the right.
-------------------------------------------------------------
19th August 2016
On Wednesday the 17th August I went to Rocky Joe's Cafe in Wellingborough to meet up with Richard and Scott, DickyDiesel and Scott-e-Dog on Northants 4x4.com to collect two later oil cooler adapters and a couple of rubber O-Rings. Many Thanks goes out to them both for their help.
So then, Yesterday, I tried trial fitting the Radiator with the integrated Oil Cooler and I was getting very frustrated because I couldn't foresee how it should or could be fitted. I put a call-out on a couple of forums and asked for some photo's of those that had done this before. Studying the photos gave me a few ideas and today I set about fitting the Rad.
I spent some considerable time working on the Rad frame. I cut off and smoothed over all the little brackets and bits that stick out on the frame. Shortened it to go all around the Rad, meaning I cut of the bits that held the InterCooler.
It looks like this.
Anyhow, I decided not to use the frame and came up with a different idea.
The top and bottom sections that I cut of the original frame were cut up and ground off to make two brackets to be welded to the front chassis crossmember.
These were welded to the chassis.
I then set about cutting the front panel to fit the TD5 Intercooler.
Air saws, aren't they just brilliant bits of kit.
Here's a vid of how noisy they are.
I also cut off a couple of brackets on the Intercooler. These are not needed and got in the way in where I need to mount it. There are other brackets that I can use to mount the Intercooler.
Thinking that one of the Oil Cooler Pipes wasn't going to be long enough to fit squarely, I set about re-routing it and spent a fair while fiddling around with the injector pipes to get the oil cooler pipe to go where I wanted it to go. Bloody waste of time that was. Now that the Rad is almost mounted, I find that the pipe is now in the wrong place. So, tomorrow, it'll be going back to where it was to start with.
This was a proper fiddly job to get it here.
All in all now, I can see it's coming together.
-----------------------------------------------------------
20th August 2016
So the first thing I did today was move the Oil pipe. I'd wasted valuable time messing around with it yesterday, when I should have just left it till the Rad was fitted proper.
Here is where it is now and it fits to the rad without fouling.
I then got on with mounting the the intercooler in place.
I welded some made up brackets to the front panel.
Here in the photo you can see where I re-routed the top oil pipe.
I also should mention that I used the Track Rod End thread on the Steering Arm on the Relay as a guide as to how high to mount the intercooler. I wanted it as far forwards as possible, without it fouling other bits. The bonnet release arm was another guide. I rested the intercooler on the top of the thread on the track rod end and then leveled it off as is. After making brackets for the intercooler to be fixed steady, I ground off the top of the thread on the track rod end to give clearance on the steering.
Radiator Brackets welded to the chassis.
A couple of fabricated intercooler mounting brackets.
So once I was happy with how the Rad sits and with the intercooler brackets and the Kenlowe Fan that'll be mounted in between the two Rads, I took it all apart to paint it all.
Sprayed the Rad black.
The Intercooler got a coat of primer and then a coat of silver.
And I also gave the "Old Wobbly", as I call it, Kenlowe Fan a coat of Silver also.
I really should buy a new one as this one is proper wobbly but still works.
Tomorrow is going to be, "Take the front Panel off and give it a bit of a refurb".
-------------------------------------------------------
21st August 2016
Time to do the front panel.
--------------------------------------------------------
31st August 2016
Well time flies, don't it?
10 days on and I still haven't finished the Front Panel.
I did take the Bank Holiday Weekend off and the wife and I went to Leafers @ T'pit. For those that don't know, "Leafers" as it's known, is a Leaf-Sprung only Land Rover event at the National Coal Mining Museum up near Wakefield. This is a fantastic weekend away to see like minded folk and their Leaf-Sprung Land Rovers. It gets better as each year passes, so google Leafers @ T'pit if you are interested in going.
Here are a few photos.
This old Ford turned up in the carpark.
--------------------------------
So, I have been filling and sanding and filling and sanding and filling and sanding.
The front panel wasn't the best, but I didn't want to go cutting a good panel and find I got it all wrong. So the panel I used for cutting was a well used and rusty jobbie. I started with a grinder to grind off most of the flaky rust, then I just lobbed a load of Glassfibre Filler in the holes.
Then ground it down and filler (P38) went in.
Then more sanding and more filler and sanding.
This is where I'm at now.
This needs another sanding over and then a good coat of grey primer.
-----------------------------------------------------
2nd September 2016
This morning was spent sanding the Front Panel with the DA Sander. Finally, I'm happy with the result of the constant sanding. Gave the panel a thick coat of grey primer. Left it to dry for a day, then it'll need a going over with wet & dry sandpaper, before I spray it with some Marine Blue...
I then spent the rest of the day making an exhaust. I started at the Turbo end and then literally added bits of pipe as I went along. I fitted a straight through silencer and tucked it up under the front of the floor.
Also fitted another straight through silencer under the front end of the tub just in front of the rear wheel.
This is the rear box
Ground the welds down to try and make it look like one pipe, rather than lots of bits welded together.
This is the front box.
------------------------------------------------------------
3rd September 2016
This afternoon, I rubbed the front panel down with wet & Dry 600 grade and then gave it a coat of what was supposed to be Marine Blue. It looks more greeny blue in reality.
The paint came out of this tin from Agricolour. Apparently, there are two different Marine Blues. I have the wrong one even though it says "Landrover Blue" on the tin and the paint code denotes Marine Blue.
Anyway, it looks okay for now and it's done the job of sprucing up the front panel.
Here's a close up of the colour.
With what was left in the spray gun, I used it on my steps.
So while the panel and steps were drying, I got on with grinding the welds down on the homemade custom exhaust.
After a good grinding down, the front section looked like this.
I then gave both sections a coat of this Stove Enamel
The front section is still wet so it looks shiney.
It will dry to a matt finish like this rear section.
-----------------------------------------------------
4th September 2016.
Fitted the Exhaust today. I'm hoping the Stove Enamel Paint won't burn off. It's good for 600 degrees, so I'm hoping I won't be having to touch it up with more spraying.
First straight through box.
I need to get a proper clamp.
Both boxes.
Rear Box.
Tailend.
I'm quite pleased with how the exhaust has turned out.
However, it may just be a tad too close to the battery box.
-------------
Also today, I fitted the Front Panel, Radiator, Kenlowe Fan and the Intercooler.
The fan actually touches the intercooler, so a piece of rubber mat was glued to the back of the fan between the fan and the intercooler. This was deliberately done so that there wasn't any vibration and banging with the fan to the intercooler. There's plenty of adjustment to leave it hanging in between the rad and the intercooler. But I didn't like the way it moved back and forth without making some stays.
You can just about see the piece of rubber in this photo.
After much faffing and cutting of hoses, I finally managed to find some that fitted to where there needed to go. I also needed to fit the cooling fan thermostat in line. This will switch the fan on and off when it's needed.
The top hose was a lot easier to faff with.
Here you can see that it now fits nicely.
-------------------------------------------------------
5th September 2016.
I made up and fitted some Intercooler pipe and hoses today. I first had a rummage through my pipe/hose box and found a few bits to do the job. However, what I found was oily, rusty and dirty. So I set about cleaning up the pipes and sanding them down with some heavy duty sandpaper. 50 grit, I think it was?
I cut and welded this pipe.
Then after a good sanding, I gave it a coat of filler primer and a coat of Toolbox Red.
Done the same with these two bits of pipe.
Gave them a coat of Toolbox Red also and along with some cleaned up hoses, it fits good.
Looking good this side too.
Both pipes
-----------------------------------------------------
10th September 2016
Russ came over again and helped get the wings and bumper back on.
Got it all lined up so the bonnet shuts. Also spent some time wiring the lights up.
I fitted a new screen washer bottle.
------------------------------------------------------
11th September 2016
Terry Andrews came over to help with the landy. He got himself all dirty changing the rear diff pinion flange seal. I'd bought an original equipment leather type seal. This is the second seal in as many years. The first was very hard leather and even after a couple weeks in soak in oil, it was still hard and I think this is the reason for its premature failure. The new seal was a lot softer even before a soaking in oil.
The flange also got a bit of sanding treatment in the lathe. While I spun the flange, I gave the area where the seal sits to a good bit of polishing with some 600 wet and dry. It was very smooth with no blemishes when I'd finished, so I'm hoping that this seal will last a few years.
While doing all this, I got on with finishing with wiring the lights up. Most of the wires were cut and needed soldering. One day I may just re-wire the lot.
Also, the oil return pipe on the sump sits very close to the front prop. So Terry took the front end of the prop off and wedged it out of the way while I got under there with the grinder and ground off any excess metal on the brazed on bracket. It's a bit difficult to see this in the photo.
--------------------------------------------------
13th September 2016
I made up a little simple bracket and got the header tank mounted to the off-side inner wing. It sits just nice there in the right place.
The bonnet stay slips nicely between the wing and header tank when the bonnet is closed.
I needed to fit the sump breather pipe to the air induction side somehow and came up with this. I found that the end of a watering can be fitted over the end of the air filter and the breather pipe fitted nice and snug inside the watering can end piece. So I drilled a couple of holes and screwed the can end to the air filter and shoved the pipe up inside. It looks a bit "Heath Robinson" but sits just right. We'll see how long it lasts.
Tied the Air Filter down to the water heater pipe that runs over the top of the head.
I'm not entirely happy with that setup, but it'll do for now.
I'm bound to come up with another idea sometime soon.
Tomorrow is MOT day, so I need to do a final check that everything is in order.
I have a small section on the chassis to weld first thing.
------------------------------------------------------
14th September 2016
So I spent the morning with the jet wash out and gave the engine bay a jet wash and then the whole vehicle. Underneath and on top.
Fitted some remaining Wright-Off-Road Matting around the bulkhead and screwed on the chassis plate.
Adjusted the exhaust a bit, as it rattled on the chassis.
I also removed the wiring for the small winch in the rear tub and made good with the caravan charging electrics. This needs rewiring to under the passenger seat.
While I was under the Landy, I welded up a small hole in the chassis.
I then generally went round everything and made sure everything was working like the lights, etc.
I went out and got some Antifreeze and topped up the engine and radiator. A whole 5 litres went in and then topped up with water.
I then fired her up and let her run to full temp and checked again for fluid levels.
Adjusted the tickover, as I thought it was too slow and the engine was wanting to shake the Landy to bits. There are a few rattles to sort with loose panels and the alike. Particularly the light on the roof. It's a period thing and the bearings are very worn and it rattles at every opportunity. I shall remove it before I set off for Wales on the 22nd September.
At 3:30-pm I went to www.motorvation-ltd.co.uk ...
It's at Rothersthorpe Road, Northampton, NN4 8HZ
01604 765007
The MOT man was a very nice chap and very reasonable with the MOT.
So long as it's safe and everything works, it'll pass.
And so it did. I came away with a fresh MOT.
So I'm a very happy chappy today.
It'll also my sons birthday today and we all went out at 7-pm for a Chinky to celebrate.
Here is "The Fluffle Valve Express" out in the sunshine for the first time since March this year.
Here's a little girl that has missed the Landy all summer.
This is Ruby and she just loves the Landy.
So today, I let her have a sit in the cab.
It wasn't long before Ruby's daughter, Sapphire came and sat by the door wanting in as well. So the pair of them sat in the Landy for the best part of the day.
I'm off to Ireland tomorrow to go to my niece's wedding.
I'll have two days to do stuff, like wiring up the Kenlowe Fan when I get back, then it's off the Wales for a long weekends worth of Green Laning.
----------------------------------------------------------
20th September 2016
Got the Kenlowe wired up this evening.
I'll run the engine and test/check everything is actually working tomorrow.
It got a bit late in the day to be running engines and waking the neighbours.
Also made a bracing steady bar for the header tank and I glued in some more of the Sound Proofing.
--------------------------------------------------------
21st September 2016
Got some more done today.
Cracked on and got more sound proofing done.
--------------------------------------------------------
19th June 2017
Well, it's been a while since I updated this blog.
The Landy and the 200TDi engine have been running fine. I have also been running it, for the last 6 months or so, on WVO, (waste veg oil) mixed with Diesel and a dash of Petrol.
--------------------------------------------------------
More updates coming soon.